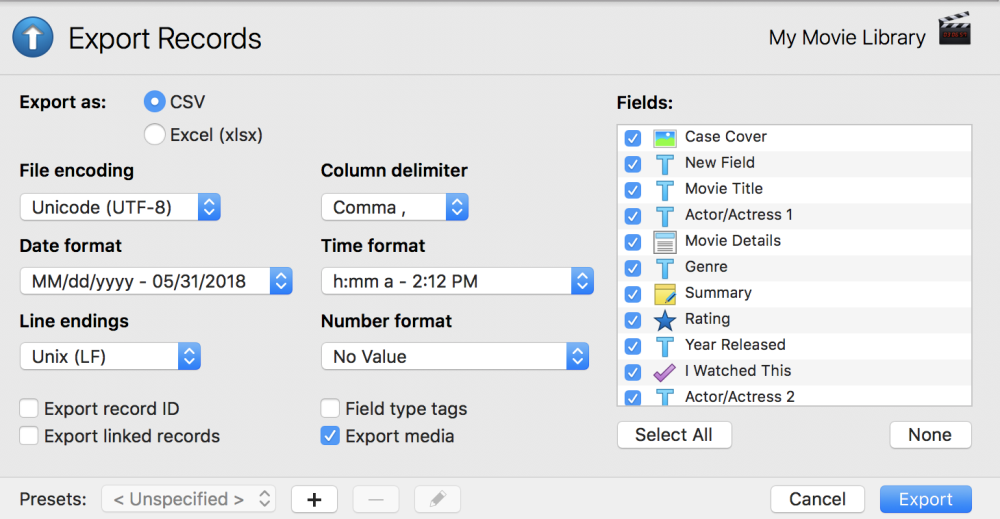
Whether you’d like to move your data into an Excel spreadsheet, share it with a colleague, or move into another version of the app, Tap Forms offers export functionality that quickly converts your data into a CSV or XLSX file. To get started, open Tap Forms, click “File”, hover over “Export”, and choose “Records…”.
When viewing your export options, you’ll have access to a variety of customization options for your CSV file. Although the default options may work for you, it’s important to pay attention to the settings displayed here; without the right export selections, your file may not appear as desired in the relevant app.
On the right side of the window is the list of fields that will be included in the exported file. These will display as the header of the columns, with the subsequent rows being filled by the content of your form. To remove any unwanted fields from the CSV file, tap the check box next to its title.
Below is a summary of important settings when working with the export features.
File Encodings
As in the Import Records function, you can tell Tap Forms to export your file in a variety of file encodings. UTF-8 is generally the best encoding to use as it supports encoding characters in all languages. It may depend on the program you want to import your data into that dictates which file encoding you should use. Check the other program to see what file encodings it supports.
Number Formats
Tap Forms can also export Number fields in a variety of different formats. For the Currency format, Tap Forms will use your regional number format settings to determine what currency symbol to use during the export. For example, in Canada and the USA currency numbers will be exported like $29.99, but in Europe the same value would be exported as 29.99 €.
Export Record ID
By enabling this option, you’re telling Tap Forms to export the values that uniquely identify each record in your form. Tap Forms will add a column called form_record_id to your CSV file. If you import a file into Tap Forms which has a form_record_id column, it will search for matching records and update their field values rather than adding new records to your form.
Export Linked Records
With this option enabled, Tap Forms will generate separate files containing the records from any linked forms. If you want to import these files into another copy of Tap Forms, make sure you import the parent form’s CSV file first and then import the child records. This way, Tap Forms will be able to join up all the child records to the parent records.
Field Type Tags
By turning on Field Type Tags, you’re telling Tap Forms to generate a header row that contains a tag that identifies the field’s type.
The following are the tags that Tap Forms will generate
| Tag | Field Type |
|---|---|
| <text> | Text |
| <number> | Number |
| <date> | Date |
| <time> | Time |
| <date_time> | Date & Time |
| <check_mark> | Checkmark |
| <contact> | Contact |
| <web_site> | Website |
| <note> | Note |
| <photo> | Photo |
| <audio> | Audio Recording |
| <phone> | Phone Number |
| <rating> | Rating |
| <location> | Location |
| <email> | Email Address |
| <calc> | Calculation |
| <file> | File Attachment |
| <form> | Link to Form |
| <draw> | Drawing |
| <section> | Section Heading |
| <date_created> | Date Created |
| <date_modified> | Date Modified |
For example, a CSV export file of a movie library form would look something like this:
| Movie Title<text> | , | Release Year<number> | , | Synopsis<note> | , | I Watched This<check_mark> |
|---|---|---|---|---|---|---|
| Terminator 2: Judgement Day | , | 1991 | , | The cyborg who once tried to kill Sarah Connor is dead, and another T-101 must now protect her teenage son, John Connor, from an even more powerful and advanced Terminator, the T-1000. | , | 1 |
Export Media
When you enable this flag, Tap Forms will generate a zip file that contains your records in CSV files and also a folder within the zip file that contain all of the media referenced in your records. Each media type will have a separate folder named with the name of the form being exported and the media type. For example “My Work Expenses-Photos”, “My Work Expenses-Files”, etc.
Need more help with this?
Don’t hesitate to contact us here.

