Diving further into this Build a CRM series of Tap Forms Projects, we’ll explore a variety of ways to use data from your forms. Things like creating reports, printing various layouts (and labels!), editing your data and attachments with other apps, and even collaboration!
If you want to get caught up on the series, check out Build a CRM part 1, part 2, and part 3. You can also sign up to my (mostly) monthly newsletter which rounds up recent blog posts, Tap Forms tips, and occasional interviews with users from a variety of industries and backgrounds.
Now, let’s put your data to work.
Printing and Saved Searches
One of the more popular ways to make use of one’s Tap Forms records is to print them. This can work even if you use a filter like Saved Searches to create a report of, say, all your CRM contacts you haven’t spoken with in over a month. Or maybe just the contacts who have notes attached so you can review and annotate them.
You can also print to a PDF file by clicking on the PDF button at the bottom of the Print panel. This is handy if you want to email a PDF file rather than printing a physical copy.
To print all records from a Saved Search:
- Select the Saved Search
- Use File > Print
- In the print dialog that appears, be sure to click Show Details
- In the full details print dialog, select Print all records (That means all records in your Saved Search, not all records of the entire form)
Printing default and Custom Layouts
There are a couple important details to know about the way layouts behave when printing forms from a Mac.
If you print the default layout of a form, records will automatically span multiple pages. Any fields that don’t fit on the first page will appear on the next.
Things get more interesting with Custom Layouts. First, only what fits on a page will be printed. But, you can chain multiple Custom Layouts to be printed together. It’s simple too:
- Open a form with multiple Custom Layouts, and select one
- Click the Layout panel in the top toolbar
- Near the top of that panel, click the Print Next menu
- Select the Custom Layout to print after the current one prints
- Optionally, rinse and repeat these steps on the other Custom Layouts in this form
Printing labels

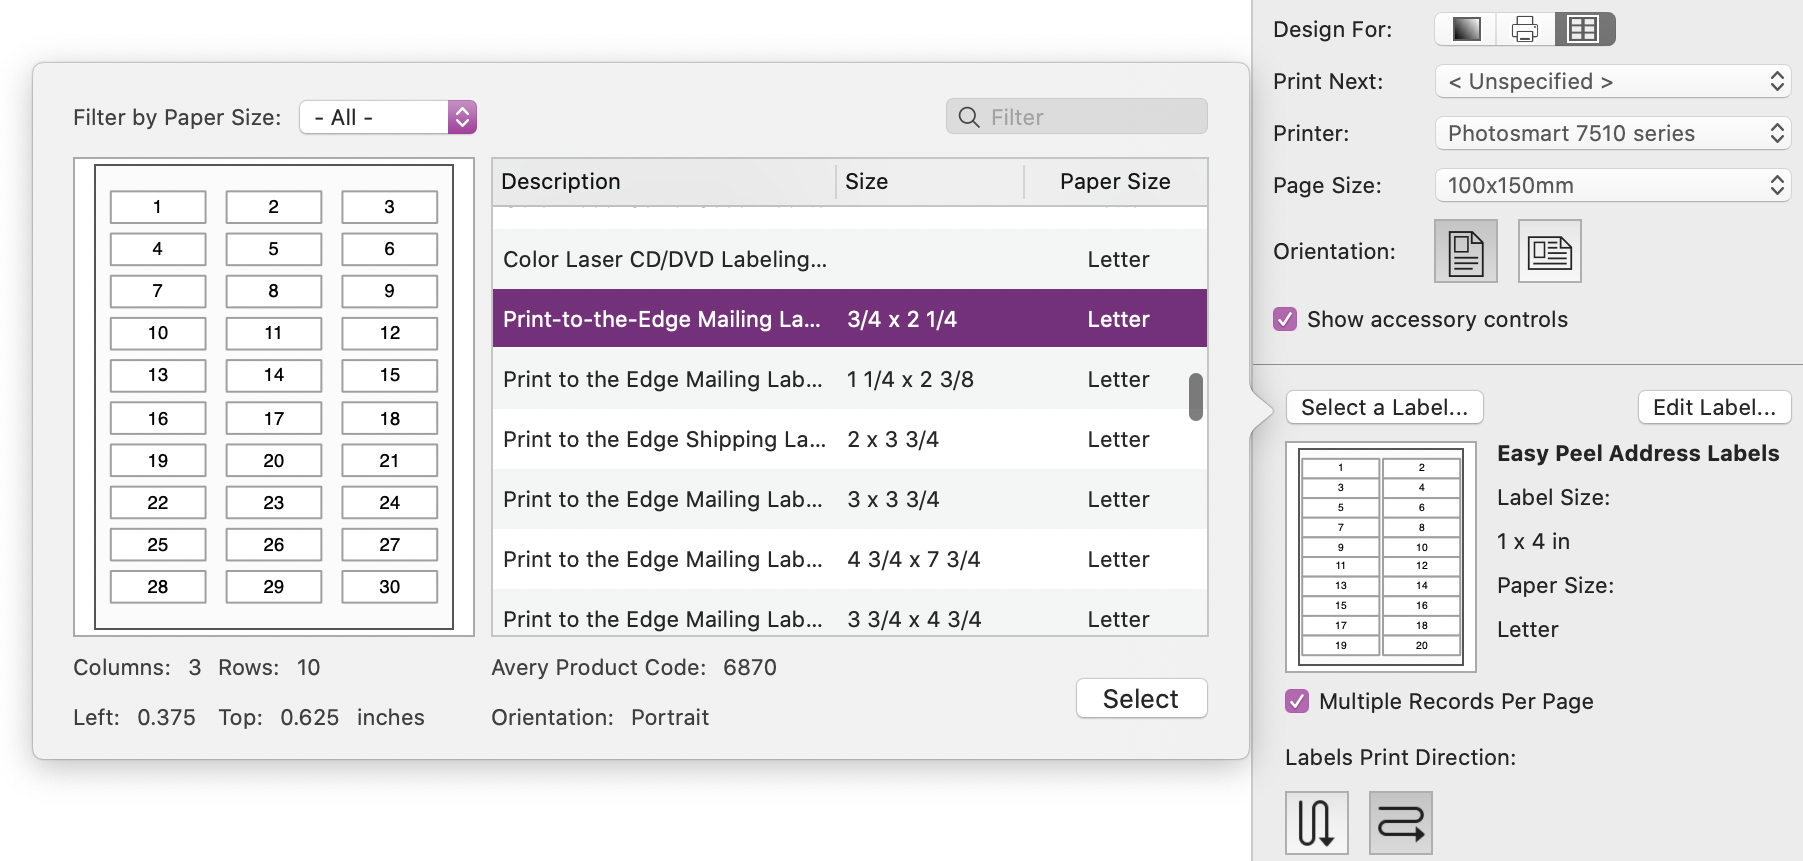
Tap Forms is a label printing machine. It’s great for barcodes, addresses, and everything in between. Over 1,000 Avery label formats are supported, or you can create a custom size. These custom labels have a lot of flexibility, as they support multi-line text and even media.
To create a layout for labels:
- Add a new layout
- In the Layout panel, set Design For to Labels (the right option)
- In the new panel setting that appear, click Select a label. Here you can preview all the supported label formats or type in an Avery code if you know the one you want
- Click the label to use, then click Select
- From the bottom of the Layout panel, drag fields onto your new label
Your Custom Layout will change to reflect its new Label design. Since this project is about a CRM, and address labels are the most popular kind created in Tap Forms, I’ll share an address-related trick.
You can quickly create an address label that uses a flexible layout, of sorts:
- Select Text tool at the top of the Layouts panel (the ‘A’ icon)
- Draw a box on your label template
- Type the case-sensitive field titles into the box, and surround each field title with square brackets, like the example below
This allows Tap Forms to automatically expand a field’s width, and move any fields next to it, in case a label’s contents are wider than others (for example, someone has a long city name that might not fit inside a static label box).
Here is the example text for quickly creating an address label by hand:
[Company Name]
[First Name] [Last Name]
[Address]
[City], [Province]  [Postal Code]
[Country]
Working with other apps
There are a couple of key tricks you can use to edit Tap Forms data with other apps.
Edit with Excel, Numbers, and more
Tap Forms can export a form to a CSV file, complete with record IDs and any attachments in a related folder. You could then edit that CSV file with a compatible app like Microsoft Excel or Apple Number.
If you then import that edited CSV file back into its original form, Tap Forms will use the record IDs match the form’s records and updated any modified entries.
Edit attachments with compatible apps

With any forms that include the File Attachment field, simply double-click the attachment to open it in external, default parent app. For example, a photo attachment might open in Apple Preview or Pixelmator Pro, if you’ve set it as the default for photo files.
Any edits you make to that file will be saved right back the attachment in your form.
Collaboration
Tap Forms does support a way to collaborate with others, including access controls with the Mac version. Currently, this requires either some technical skills or a business environment, as my recommended sync services are IBM Cloudant and Apache CouchDB. ‘Nearby Sync’ is also an option if your collaborators are, well, nearby.
You can learn more about the IBM Cloudant and Apache CouchDB sync and collaboration options in my support docs.
Exporting

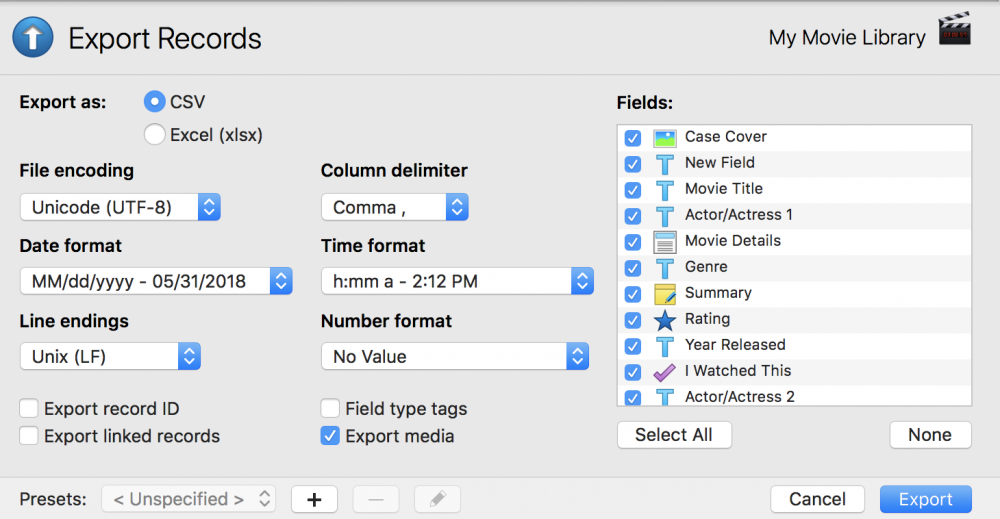
Tap Forms has a powerful export tool that can customize a lot about which data you export, and how. I explain this tool and its many features in the export support doc, so we’ll just explore a couple ideas here.
First, this tool is a great way to share specific portions of your CRM data with others. You can turn off any fields in a form from being exported, and change a handful of data formats. To double-down on this power, you can save your export customizations as presets.
This is perfect in an environment where you’re managing a CRM for your business or organization, and others need occasional updates on current clients, project progress, and any other key bits of data.
Backup forms and documents
As the saying goes, you can never be too safe, and you can never have too many backups. Well, I guess you completely fill your storage space with redundant backups, one could argue that’s too many.
Still, backing up your documents is easy with File > Backup on Mac and Tools > Backup & Restore > Plus button on iOS. Tap Forms simply zips up the .tapforms document to conserve space and stores it with a timestamped filename, so each time you backup, you get a new file.
Conclusion
I hope this post helped spark some ideas for flexing your CRM data and taught you more about how to use Tap Forms. I’d love to hear what you think of the series in my forum or on Twitter.
If you need to catch up on the CRM Tap Forms Projects series, check out part 1, part 2, and part 3.
Tags: Build a CRM, Tap Forms Projects